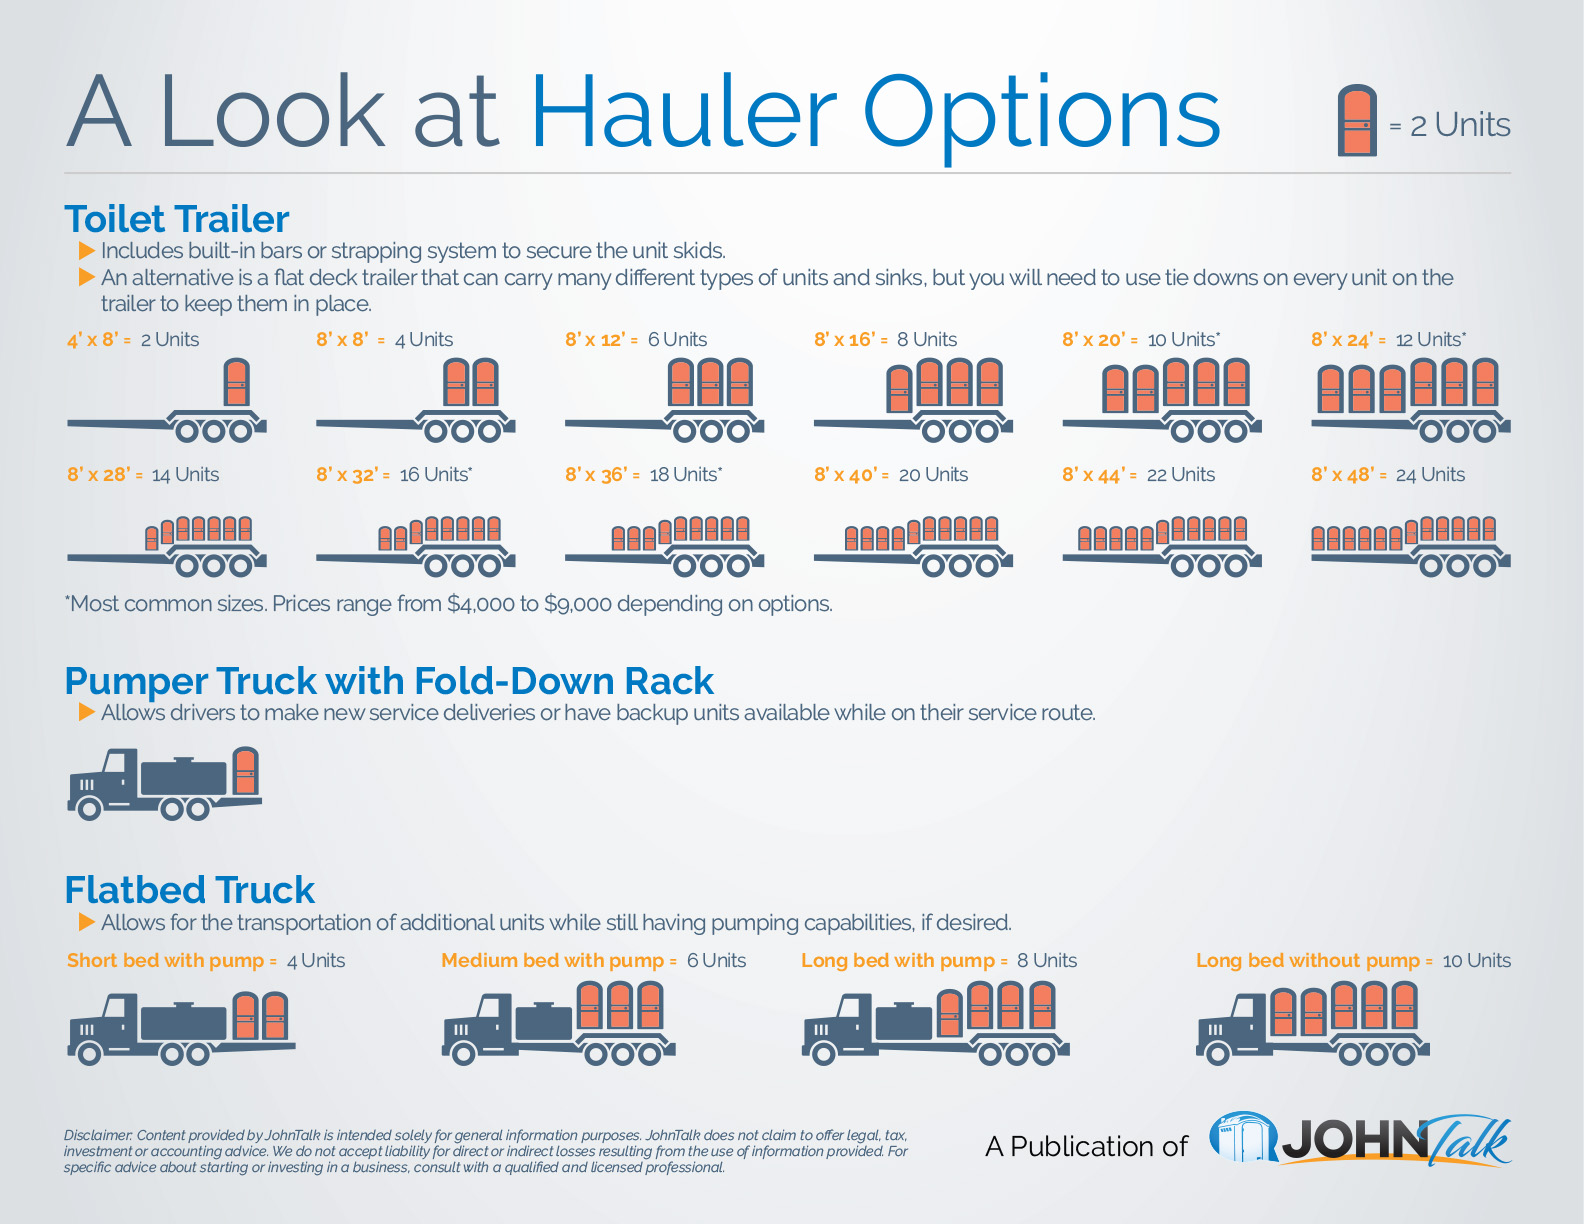
INFOGRAPHIC: A Look at Hauler Options
January 21, 2019
Save Time with Strapless Transportation Solutions
February 4, 2019For almost every outdoor activity, event and work project in society today, we owe a debt of gratitude to a little marvel of engineering – the vacuum pump. The vacuum pump is the heart of the portable sanitation industry. It has made portable sanitation, and by extension, our entire outdoor lifestyle, possible.
These pumps create a vacuum with the power to suction clean a portable toilet full of gallons of waste in just a few minutes. Because we have such an efficient portable sanitation industry, outdoor events are clean, sanitary and accessible to all, young and old. Outdoor job-site work proceeds with minimal man-hour interruption… and happier workers.
The pump carries a heavy load to help us achieve this higher standard for our outdoor environment. Even a PRO with his own business can service about 40 units every day. In order to do so, the pump must perform flawlessly, each and every time. Continuous-duty performance and durability are the hallmarks of the most popular and in-demand pump brands.
As with all things mechanical, maintenance is essential to proper performance. Considering the amount of work pumps perform, it’s surprising that it doesn’t require a lot of upkeep to keep them running with such amazing regularity. But they do require a very manageable schedule of maintenance. Problems do arise, so troubleshooting and fixing pumps on the fly will be necessary.
Most PROs purchase a pumper truck that comes “ready to roll” with the vacuum system, tank
In this type of pump, rotating vanes create suction at the inlet. Fluid is drawn into the pump, and the vanes carry it to the discharge, where contraction of the space where the liquid is contained expels it. A clear and brief explanation of rotary vane vacuum pump principles can be found at https://www.youtube.com/watch?v=L30JpM8Lv_A.
On a pumper truck, the vacuum is part of the vacuum system, with components that are essential to safe, efficient operation that also protect the integrity of the pump and allow it to do its job. Maintenance of these components is critical to smooth operation.
We will assume for the purposes of this article that you have purchased a pumper truck that uses a rotary vane vacuum pump and that the truck has come with all the necessary components of the vacuum system.
Preventative Maintenance
Oil Well
If the vacuum pump is the heart of portable sanitation operations, then oil is the blood flowing through the body. Oil keeps the pump lubricated and running.
Proper oil maintenance is an everyday demand, but not a difficult one. It’s mostly common sense. The key is making it a habit.
– Always have the proper amount of oil
Never operate your pump without oil. It’s simple – keep it lubricated or it can fail.
– Use the correct oil
Use the oil type and weight recommended by the manufacturer. The pump can fail just by using the wrong oil. Definitely do not use automotive motor oil, gear oil or other oil-like fluids (brake fluid, hydraulic fluid, transmission fluid, power steering fluid).
You will often see instructions to use a different viscosity-grade oil depending on temperature. For example, the recommendation might be 10W-30 in the summer and 5W-30 in the winter. The lower number means the oil will flow better at lower temperatures. The cutoff point is determined by the suction temperature: greater than 50°F equals summer conditions.
– Check the oil level every day
Check the level before starting the unit. Top off if the level is low. If you’re working a long day, check the level after 8 hours of operation.
– Check for water condensation
In freezing weather, water can form on the bottom of the oil tank due to condensation. Ice can wreak havoc on your pump. Drain and clean it.
– Don’t reuse recovered oil
One component of the typical vacuum system on a pumper truck is an oil separator that removes oil from the pump exhaust. Do not reuse this oil in the pump.
Some pumps may have additional or special instructions concerning oil usage. Consult your owner’s manual.
Don’t Forget to Flush
Flushing the pump is top-priority preventative maintenance. Flushing removes foreign material, moisture
Some recommendations say flush every day, others weekly or regularly, but flushing is always recommended immediately after any liquid or solids have been drawn into the pump (and you will at some point get liquids or contaminants in your pump).
A flush kit is often provided by the manufacturer, or they can be purchased separately and installed on the unit. The flushing procedure is simple, but there are important variations between manufacturers, particularly in the use of specific flushing fluids, so always follow the directions in your owner’s manual. Never use a flammable liquid for flushing.
In general, to flush the pump, you first bring the vacuum to about 10-15” Hg., then introduce a small amount of flushing fluid (about 7 oz.) into the pump. Allow the fluid to circulate for several minutes. Stop the pump and drain the oil separator. Properly dispose of the used fluid.
Washing
Your pump creates heat as it’s running. To prevent the possibility of overheating, pump manufacturers recommend washing the pump housing on a regular basis. Dirt can hamper the ability of the pump to properly radiate heat.
Inspect the Vanes
The vanes that give the name to the rotary vane vacuum pump are durable (some are even made from Kevlar) and deliver many work hours under the harshest conditions. Ultimately, however, they will wear down to the point that they need to be replaced.
When vanes become worn, they can become too short to maintain proper clearance with the inside surface of the housing, which is necessary to create the vacuum. Worn or damaged vanes put extra load on the pump, which then has to work harder, making it less effective and efficient. There are many reasons vanes wear, such as overspeeding or inadequate oil supply, that can be avoided through preventative maintenance. Other causes of wear, particularly contaminants in the pump, occur unavoidably as part of the process.
Vanes should be examined about every 6 m
If the vane is worn to the point where it needs to be replaced, replace all the vanes at the same time. Use only the recommended replacement vanes, as using other types or brands may damage the pump.
Maintenance of Vacuum System Compartments
As mentioned earlier, proper care and maintenance of all the components of the vacuum system on the pumper truck will greatly contribute to the good “health” of your pump. These components include:
– Primary shutoff trap
Prevents liquid in the tank from getting into the pump. The primary is located on the topmost position of the tank. As the tank reaches capacity, the primary shutoff seals off the airflow and stops the filling. This prevents liquid waste from backing into the system and the pump.
Service: Inspect monthly or periodically. Don’t remove the lid when the system is under vacuum.
– Secondary moisture trap (scrubber)
Backup for the primary shutoff. Should waste escape from the primary, it will flow into the secondary trap.
Service: Should
be drained at the end of each day’s service. This is an especially important
consideration when servicing during cold weather, to
prevent hard, frozen waste from damaging the pump. Visually inspect the
interior once a month for periodically. Don’t open the ball
valve when the system is under vacuum.
– Inlet filter
The filter catches any waste that has gotten through the primary and secondary trap.
Service: Inspect periodically. Wash and clean or replace.
– Oil separator/muffler
Removes oil from pump exhaust and reduces the sound level of the pumping system.
Service: Drain oil at least once or twice a day. Properly dispose of removed oil. Do not reuse the oil.
– Vacuum relief valve
Prevents too much vacuum from building in the tank, which can cause it to implode or collapse.
Service: Monitor while system is in use, and test once a week to make sure valve is in good working order.
– Pressure relief valve
Prevents too much pressure from building in the tank, which can cause it to explode.
Service: Monitor while system is in use, and test once a week to make sure valve is in good working order.
– Pumper scent
Deodorizes air exhausted from pumping system.
Service: Drain and clean the vaporizer chamber annually.
Get the JohnTalk “ALL-ACCESS PASS” & become a member for FREE!
Benefits Include: Subscription to JohnTalk Digital & Print Newsletters • JohnTalk Vault In-Depth Content • Full Access to the JohnTalk Classifieds & Ask a PRO Forum
Troubleshooting
Your familiarity with the pump (and vacuum system) can be a real asset when something goes wrong. The more you know and understand about your pump, the faster you can recover and get back to the job.
Let’s review some of the most common issues that occur directly with the pump or throughout the entire vacuum system that may be affected by the pump itself. This isn’t a comprehensive troubleshooting guide, but a highlight of some significant issues and common causes, as commonly covered in owner’s manuals.
Problem: Pump is overheating
Overheating can cause the pump to shut down.
Possible causes:
– No oil or insufficient amount of oil. Check to see that the oil reservoir is full. Monitor the pump during use to ensure that it is using oil at recommended rate of consumption.
– Wrong oil. Use only the manufacturer’s recommended type of oil. Note the proper weight.
– Operating pump at excessive vacuum or pressure levels, or pump is running too long at full vacuum. Pumps are under less strain when running cooler rather than hotter. Relieve vacuum or pressure after loading or unloading. Make sure relief valves are properly set.
– RPM is too high. Adjust to RPM level recommended by the manufacturer.
– Pump is dirty. As mentioned earlier under maintenance, washing the pump on a regular basis allows the pump to radiate heat more efficiently.
– Also, check for leaks, plugged oil line or filter, and malfunctioning components.
Problem: No vacuum in the tank
A problem in the v
Possible causes:
– Pump running backward after stopping. Defective or broken non-return valve. Replace valve.
A non-return valve, also called a backup valve, prevents liquid or gas from flowing in a reverse direction due to back pressure.
– Pump has worn vanes. Inspect the vanes. If one needs to be replaced, replace all at the same time.
– Pump is not turning fast enough. Check manufacturer’s RPM setting and adjust accordingly.
Other potential causes not due to pump operation:
– Valve in neutral or not fully set to vacuum. Check valve for correct position.
– Leaks. Check for leaks in the tank itself or any fittings in the system.
– Collapsed hose. Replace.
– Tank not closed. Close tank securely.
– Valve or filter is clogged or blocked. Inspect and clean.
If in doubt, and if there are no helpful guidelines in the owner’s m
Looking to Take Your Portable Restroom Business to the NEXT LEVEL? Download our FREE Guide: “Your Guide to Operating A Portable Restroom Business.”
Thinking About GETTING INTO the Portable Restroom Industry? Download our FREE Guide: “Your Guide to Starting A Portable Restroom Business.”


